
How to Draw a Body Step by Step: A Beginner’s Guide to Human Anatomy Drawing
Drawing the human body may seem like an intimidating task, but it doesn’t have to be. Whether you’re an aspiring artist, a passionate hobbyist, or a beginner learning how to draw for the first time, this detailed guide will walk you through how to draw a body step by step. With practice and the right approach, anyone can learn to sketch realistic human figures with confidence.
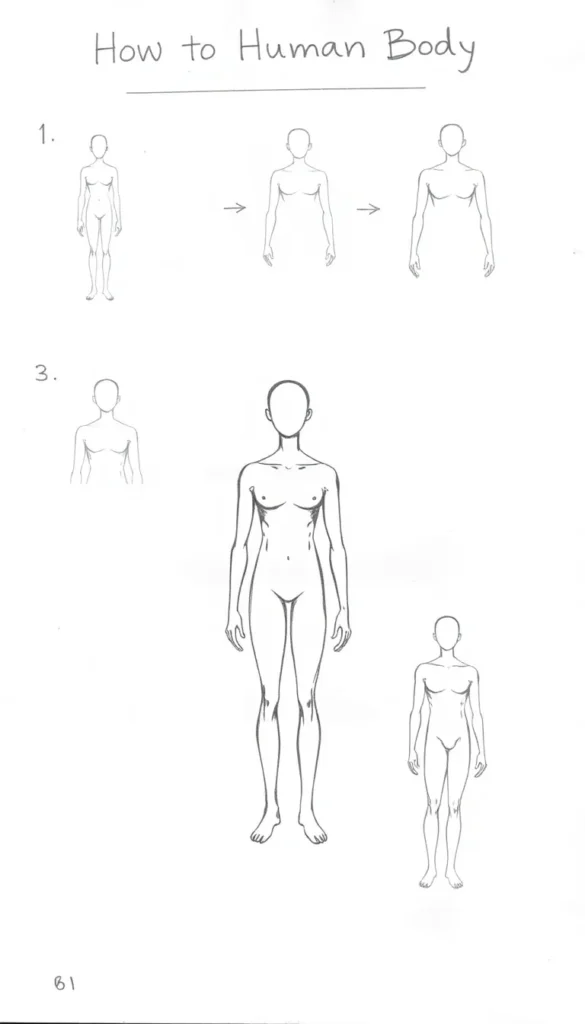
Table of Contents
Table of Contents
- Why Learn to Draw the Human Body?
- Understanding Basic Human Proportions
- Materials You’ll Need
- Step-by-Step Instructions for Drawing a Body
- Common Mistakes and How to Avoid Them
- Practice Tips and Exercises
- Final Thoughts
1. Why Learn to Draw the Human Body?
Drawing the human form is a foundational skill in art. From classical figure drawing to comic books and digital illustrations, human anatomy is at the heart of countless visual art styles. Mastering this skill improves your overall understanding of proportion, movement, and gesture.
Learning how to draw a body step by step also helps build your confidence as an artist. Once you grasp the basics, you’ll be able to draw figures from imagination, reference, or even live models.
2. Understanding Basic Human Proportions
Before diving into the actual drawing, it’s crucial to understand the general proportions of the human body. These aren’t strict rules, but helpful guidelines for keeping your drawings anatomically correct.
General Human Body Proportions:
- The average adult body is about 7.5 to 8 heads tall.
- The shoulders are about 2–3 heads wide.
- The torso takes up about 3 heads in height.
- The legs account for roughly half of the body’s height.
- The elbows align with the waist or navel.
- The wrists fall around the top of the pelvis.
- Hands end roughly mid-thigh.
Using the “head count” method helps maintain balance and symmetry while drawing.
3. Materials You’ll Need
You don’t need expensive tools to get started. Here’s a basic list of supplies for learning how to draw the human body:
- Sketchpad or drawing paper
- HB and 2B pencils
- Eraser (kneaded or rubber)
- Ruler (optional for measuring proportions)
- Blending stump (optional for shading)
- Reference images or anatomy guides
If you’re working digitally, apps like Procreate, Krita, or Photoshop offer brushes and layers to simplify the learning process.
4. How to Draw a Body Step by Step
Now, let’s break down the process of how to draw a body step by step, suitable for beginners.
Step 1: Draw the Head
Start with a simple oval or circle for the head. This serves as the foundation for measuring the rest of the body. Draw a vertical centerline and a horizontal eye-line to keep the face symmetrical if you plan to add facial features.
Step 2: Add the Spine and Torso
From the base of the head, draw a vertical line (the spine) to represent the body’s posture. Then sketch two shapes:
- An inverted triangle or trapezoid for the chest/upper torso
- A smaller oval or box for the pelvis
Make sure there’s a small gap between the ribcage and pelvis, indicating the waist.
Step 3: Indicate the Limbs with Simple Lines
Use straight or curved lines (also called “gesture lines”) to mark where the arms and legs will go. These lines help you plan the movement and flow of the body before you add volume.
Mark key joints:
- Shoulders, elbows, wrists (for arms)
- Hips, knees, ankles (for legs)
Use small circles to show where each joint is located.
Step 4: Add Volume to the Limbs
Now that the structure is in place, start adding cylinders for the arms and legs. Think of the limbs as 3D shapes instead of flat lines.
- Arms: Use a cylinder from shoulder to elbow, and another from elbow to wrist.
- Legs: Use two cylinders – thigh and shin – for each leg.
Add basic shapes (ovals or trapezoids) for hands and feet. Don’t worry about detailing them at this stage.
Step 5: Connect the Limbs to the Torso
Smoothly connect the arms to the shoulders and the legs to the hips. Begin refining the lines to suggest muscle shape or body curves. Adjust the posture if needed to make the pose more natural.
Step 6: Sketch in the Neck and Shoulders
The neck connects the head to the torso. It’s often shaped like a slightly tilted cylinder. The shoulders slope gently downward and should be aligned with the top of the torso.
Step 7: Refine the Outline
Now, trace over your sketch to define the contours of the body. Add curves for the waist, define muscle tone, and shape the knees and elbows.
At this stage, decide if your character is:
- Male (sharper features, broader chest, narrower hips)
- Female (smoother curves, narrower waist, broader hips)
Step 8: Add Hands and Feet (Basic)
Hands and feet are tricky but essential. Start simple:
- For hands: Begin with a mitten shape and separate the thumb.
- For feet: Use triangular forms for the base and indicate toes with simple lines.
Don’t stress about perfection here. Focus on correct placement and proportion.
Step 9: Finalize with Details
Add features like:
- Collarbone and shoulder muscles
- Rib outlines
- Kneecaps and ankle bones
- Clothing or hair if you want
Use a soft pencil to add shading and light for depth. Indicate shadows under the arms, around the neck, and between the legs.
Step 10: Clean Up Your Drawing
Use an eraser to remove construction lines and excess sketch marks. Darken your final lines and add any additional stylization or textures you like.
Congratulations — you’ve just learned how to draw a body step by step!
5. Common Mistakes to Avoid
Even experienced artists struggle with figure drawing. Here are a few pitfalls to watch out for:
- Overlooking proportions: Always use head-counts and reference guides.
- Stiff poses: Gesture lines add motion and fluidity. Don’t skip them.
- Forgetting symmetry: Frequently flip or rotate your drawing to check balance.
- Ignoring anatomy: Study real bodies or anatomy references to understand how muscles and joints connect.
6. Practice Tips and Exercises
Improvement comes with consistent, focused practice. Here are a few exercises to help you build your skills:
Gesture Drawing (1-5 minutes)
Quickly sketch dynamic poses from photo references. Focus on movement, not details.
Mannequin Practice
Draw simple mannequins (basic forms) in various poses to understand structure.
Copy from Master Artists
Study how professional illustrators draw the human body. Try copying their sketches to learn new techniques.
Use 3D Pose Apps
Tools like Magic Poser or Sketchfab offer 3D models you can rotate and draw from any angle.
7. Final Thoughts
Learning how to draw a body step by step takes time, patience, and a lot of practice — but the rewards are well worth it. Once you grasp human anatomy and proportions, your art will improve dramatically. Don’t be discouraged by early mistakes; each sketch is a step closer to mastery.
Remember: great artists were once beginners too. Keep drawing, keep learning, and most importantly — enjoy the process!